

To install and use Oracle EBS instance on Oracle cloud IaaS, you should have Cloud Service Administrator role to administer Oracle Cloud Services within an identity domain owned by an Oracle Account of your company.
1. Account Administrator
To start with IaaS on oracle cloud, you need an Oracle SSO account, along with Cloud “Account Administrator” access. Once you have these privileges you can navigate to cloud account dashboard using http://myaccount.cloud.oracle.com, where you can enter Oracle SSO account credentials to access cloud account.
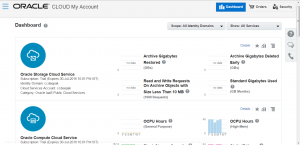
FIGURE 1 MY ACCOUNT DASHBOARD ON CLOUD
To navigate to Service Administrator dashboard, you can click on any one of the dashboard item’s Action link to navigate to My Services dashboard
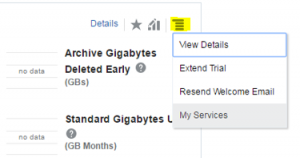
FIGURE 2 NAVIGATION TO MY SERVICES ON CLOUD
2. Service Administrator
If you have Service Administrator role, then you can enter credentials for the logged in account to access My Services dashboard. There are two ways to access Services Dashboard.
- Use http://myservices.us.oraclecloud.com and provide a domain name and click on Go button to go to Sign on page.
- Use My Services action navigation from Account Dashboard, to directly go to the Sign on page. On the sign on page to change the identity domain you can click on change domain link and provide appropriate domain name.
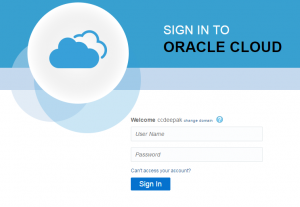
FIGURE 3 MY SERVICES DASHBOARD LOGIN PAGE
Enter credentials to access My Services Dashboard.
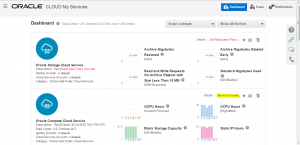
FIGURE 4 MY SERVICES DASHBOARD
On the services dashboard, click on Service Console (highlighted in yellow in Figure 4) for Oracle Compute Cloud Service to navigate to Compute Services details, where you can setup instances.
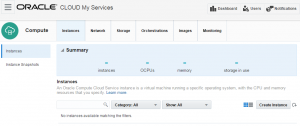
FIGURE 5 ORACLE COMPUTE CLOUD SERVICE DETAILS
3. Instance Preparation
Account and service administrators can start with a sequential list of steps to have the instance prepared on Oracle Cloud. Among these steps, Downloading OS image to Oracle account and creation of data storage or the most critical steps and takes few hours. Account administrator downloads OS image into the account. Service administrator creates storage, network components such as Security Rules and its constituent sub components. The instance is created over a storage using the downloaded image along with an SSH Key and a reserved IP. The entire process of creating an instance comprises of a set of sequential steps as shown in below figure.
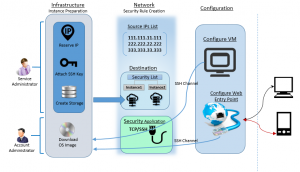
FIGURE 6 OVER VIEW OF INSTANCE PREPARATION
3.1. Download image to the account
To download an OS image to your oracle account, search for the image in oracle cloud market place. Use URL https://cloud.oracle.com/marketplace to access products in cloud market place. Search for the image that you want to install. In this case it would be EBS 12.2.5 Demo Intall Image. Click on EBS 12.2.5 Demo Install Image to go to the details page and then click on Get App button shown in below. If you are already logged in this will take to terms agreement screen, where you have to agree on the terms and install onto your company’s oracle account. If you are not logged in you would have to go through SSO login process.
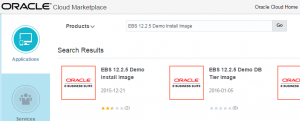
FIGURE 7 CLOUD MARKETPLACE
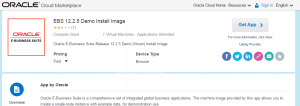
FIGURE 8 EBS 12.2.5 DEMO INSTALL IMAGE IN CLOUD MARKETPLACE
The download process takes few hours, and once after successful download the service administrator can see it under images tab in service console. This image can be further used in cloud instance creation.
3.2. Create Storage
Login to service console and navigate to storage tab. This tab displays all the storages that were created by the service administrator for your account. Click on Create Storage Volume and proceed further to create storage.
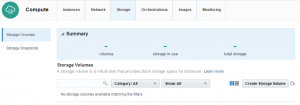
FIGURE 9 STORAGE TAB
On create storage volume page, enter appropriate values and then click on create button. For EBS 12.2.5 please allocate 500 GB of storage space, and select the image downloaded in the previous step. Once after creation of instance you will see a confirmation message and the instance will be listed under storage tab.
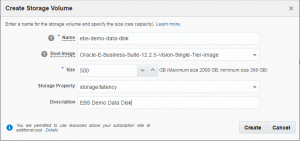
FIGURE 10 STORAGE CONFIGURATION
3.3. SSH Key
SSH Key is needed to access the cloud instance over SSH protocol. This is a twostep process where you create an SSH Key, then secure the instance by adding the public key and communicate to the instance using private key.
3.3.1. Create SSH Key
Create an SSH key from your computer using PuTTY Key Generator. Store public and private keys for later usage. Public key content is used while Adding SSH Public Key from service console. The private key file is used to access cloud instance over SSH protocol. While creating SSH Key make sure to enter key passphrase. key passphrase is needed while trying to access the cloud instance over SSH protocol.

FIGURE 11 SSH KEY CREATION
3.3.2. SSH Public Key
Navigate to Network tab under service console and add public key. While adding public key paste the public key content created above. Make sure that the entire public key content is copied and pasted while adding the SSH Public Key.
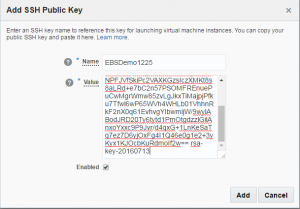
FIGURE 12 ADDING SSH PUBLIC KEY
3.4. Reserve an IP
Navigate to Network tab under service console and then to IP reservation sub tab. Click on Create IP Reservation. This IP will be assigned as a public IP to the cloud instance. Provide an appropriate name for the IP Reservation, the IP address will be automatically assigned. You can leave instance drop down None for now, as the instance is yet to be created.
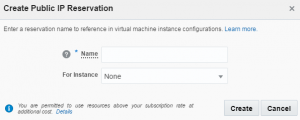
FIGURE 13 PUBLIC IP RESERVATION
3.5. Security Rule
Security Rule is used to control network access between internet and the cloud instance. Security rule defines possible source of communication to the cloud instance over a specific port and protocol type. Before creating a security rule you need to have source IP list, destination instances list and security application (port and protocol pair). Once after creation of these three sub components, the security rule is defined through the source and destination over a security application.
3.5.1. Security List
You can have a new security list created or use an existing security list if one exists. The security list is a list to which the instance can be added. This security list acts as a firewall for inbound and outbound communications to the list of instances attached to this. You can restrict inbound and outbound access privileges within the security list. These lists can be configured as destination within the security rule configuration.
Navigate to Network tab under service console, and then to Security List sub tab. Click on Create Security List to create a new security list. Provide an appropriate name, and choose Deny for Inbound Policy as this will make sure that the instance is not vulnarable for unwanted communications. Choose Permit for Outbound Policy as this will allow outbound communications.

FIGURE 14 SECURITY LIST CREATION
3.5.2. Security IP List
Security IP list holds a group of IP addresses or subnets from where there could be potential requests to cloud instances defined in the destination (security list) of security rule. This IP list is configured as source within the security rule configuration.
Navigate to Network tab under service console and then to Security IP List sub tab. Click on Create Security IP List to create a list. Provide an appropriate name, and list of IP addresses or subnets from where the cloud instance could be accessible.

FIGURE 15 SECURITY IP LIST CREATION
3.5.3. Security Application
A security rule is defined for a specific pair of port and protocol type which is called a security application. Possible protocol types are TCP, UDP, ICMP and GRE. By default there exists on application with name all which is for all ports across all protocols. Security rule defined using all, lets all the ports open for all port types, which is not recommended.
Navigate to Network tab under under service console Security Application sub tab. Click on Create Security Application. Provide an appropriate name, TCP as Port Type and 22 as Port Range Start. Optionally you can provide Range End as well.

FIGURE 16 SECURITY APPLICATION CREATION
Once you have Security List, IP List and application defined a security rule can be defined using these three components. Navigate to Network tab under service console, and then to Security Rules. Click on Create Security Rule. Provide appropriate Name, and keep the status Enabled so as to get this rule into effect. Select security application that was created in section 3.5.3, select the Security IP List created in section 3.5.2 as source and Security List created in section 3.5.1 as destination, and complete the process of rule creation.
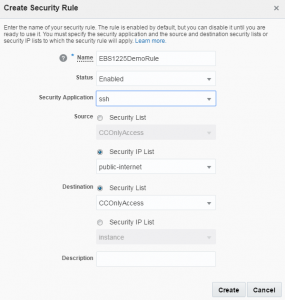
FIGURE 17 SECURITY RULE CREATION
Similarly create Security Application and Security Rule for port 8000 as well.
This concludes creation of network related components.
3.6. Create Instance
Oracle cloud instance is a virtual machine running a specific operating system, created using the image that was downloaded to your account, storage that was created by the service administrator, along with the network components that were configured. Preparation of instance is a five step process as shown below. Figure caption details each of the step.
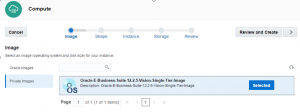
FIGURE 18 SELECT THE DOWNLOADED OS IMAGE
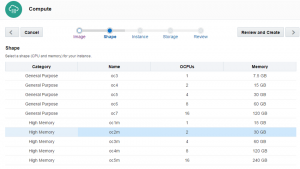
FIGURE 19 SELECT CPU CONFIGURATION
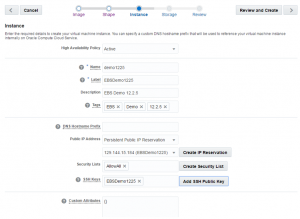
FIGURE 20 PROVIDE INSTANCE NAME, LABEL AND TAGS. SELECT PUBLIC IP ADDRESS AS “PERSISTENT PUBLIC IP RESERVATION” AND SELECT THE IP RESERVED IN STEP 3.4, SELECT THE SECURITY LIST CREATED IN STEP 3.5.1 AND ADD THE SSH KEY CREATED IN STEP 3.3.2. THEN NAVIGATE TO NEXT STEP (STORAGE) AND CLICK ON ATTACH STORAGE.
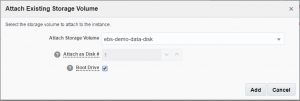
FIGURE 21 ATTACH THE STORAGE VOLUME CREATED IN STEP 3.2. ATTACH THIS AS DISK # 1, AND SELECT BOOT DRIVE.
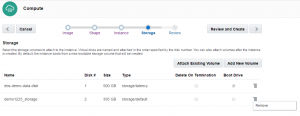
FIGURE 22 REMOVE THE DEFAULT BOOT STORAGE VOLUME THAT IS ADDED BY THE SYSTEM
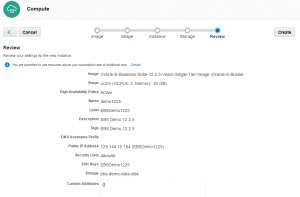
FIGURE 23 FINALLY REVIEW THE INSTANCE DETAILS AND PROCEED TO CREATION
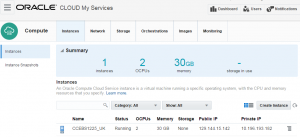
FIGURE 24 INSTANCE CREATION PROCESS TAKES COUPLE OF HOURS AND YOU WILL SEE A CONFIRMATION MESSAGE UPON SUCCESSFUL CREATION.
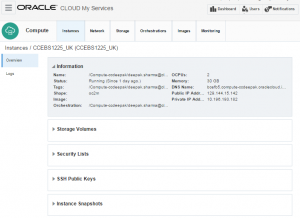
FIGURE 25 THE INSTANCE DETAILS CAN BE VIEWED IN INSTANCE TAB UNDER SERVICE CONSOLE
An Orchestration is created along with the instance that maintains the interdependencies of different components involved in creation of the instance. For example the network components and storage can be created independent of the instance or in-line with the instance as part of the instance step in the instance creation train step process. If you delete the Orchestration that was created as part of the instance, it deletes the inline or dependent components along with the instance keeping the cloud space clean.
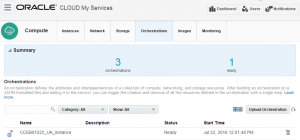
FIGURE 26 ORCHESTRATION FOR THE CLOUD INSTANCE
APPENDIX A
VM Configuration
Before you try to use the new Oracle E-Business Suite environment, you should confirm that virtual machine configuration is complete.
1. Log into the instance using SSH
- Start Pageant.exe and add the private SSH Key created in step 3.3. This will provide the key information to Putty automatically.
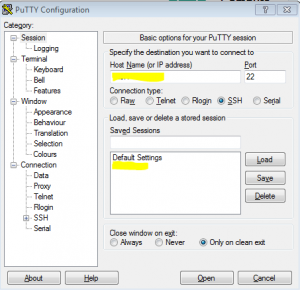
- Now start PuTTY, and in the Host Name (or IP address) field, enter the public IP address of your instance.
- In the Connection type: field underneath the Host Name (or IP address) field, select the SSH radio button if it is not already selected.
- In the Category pane, expand Connection, and then select Data to display the Data to send to the server panel.
- In the Auto-login username field, enter opc.
Try to Open this connection to log into cloud instance command prompt.
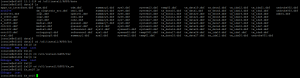
2. Look for entries like these in the log file “/var/log/oraclevm-template.log” by executing below command.
-bash-4.1$ sudo vi /var/log/oraclevm-template.log
Expected result:
[INFO] Jul 13 16:36:46 configdhcp.sh: Configuring Database Tier
[INFO] Jul 13 16:44:04 configdhcp.sh: Cloning the DB Tier Completed Successfully
[INFO] Jul 13 16:44:04 configdhcp.sh: Proeceeding with the Apps Tier Configuration
[INFO] Jul 13 17:57:04 configdhcp.sh: Cloning the Apps Tier Completed Successfully
3. Confirm that following directories are available:
a. /u01/install/APPS/12.1.0
b. /u01/install/APPS/data
c. /u01/install/APPS/fs1
d. /u01/install/APPS/fs2
e. /u01/install/APPS/fs_ne

4. If you are utilizing a bootable storage volume and these directories are missing, indicating that Oracle E-Business Suite was not provisioned, follow this procedure to correct the mount point and complete the provisioning operation:
a. Ensure that no database or application tier processes are running. If they are running, shut them down.
You can use “ps –ef | grep oracle” to find the processes and use “kill -9 pid” to kill the processes.
b. As the root user, run the command:
$ /usr/sbin/oraclevm-template –config –force
c. Reboot the VM by running the ‘reboot’ command.
d. After reboot go to Step#1 and wait till you get a confirmation in the /var/log/oraclevm-template.log file that cloning of both DB and Application tier is done.
APPENDIX B
Configure the Web Entry Point
Your Oracle E-Business Suite instance on Oracle Cloud is installed with an internal DNS name and a private IP address, so is not accessible from the public Internet. To make the instance accessible from the public Internet, you need to set the web entry point parameters in the applications context file to point to the publichostname.public domain name.
Perform the following steps to configure the web entry point.
1. Identify the public IP address of your Oracle E-Business Suite virtual machine.
Note: You can find the public IP address by navigating to the Instances tab on the Oracle Compute Cloud Service console and reviewing the details page for your instance.
2. If, for example, the public IP address of the virtual machine is 129.144.15.144, the public hostname.public domain for the virtual machine will be oc-129-144-15-144.compute.oraclecloud.com.
3. Check that the Oracle E-Business Suite database tier services (database and TNS listener) are running. If they are not, start them by performing the following steps, first setting the user account to ‘oracle’ and then running the startdb.sh script: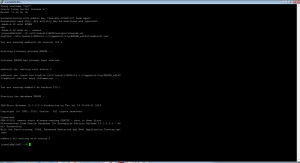
4. Run the following script to configure the web entry point:
[oracle@e51d02 ~]$ /u01/install/scripts/configwebentry.sh
The script prompts for the following parameters. Enter the values as shown below. For example, to access the Oracle E-Business Suite instance with the URL http://oc-129-144-15-144.compute.oraclecloud.com:8000:
a. Enter the Web Entry Protocol (e.g. https/http): http
b. Enter the Web Entry Host Name (e.g. public): oc-129-144-15-144
c. Enter the Web Entry Domain Name (e.g. domain.com): compute.oraclecloud.com
d. Enter the Web Entry Port (e.g. 443/80): 8000
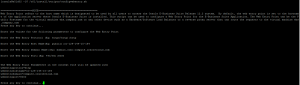
e. Enter the APPS password. Most probably APPS if not changed from default.
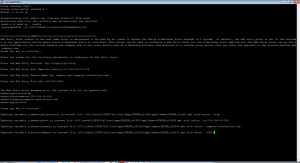
5. Log in as oracle and execute the /u01/install/APPS/scripts/stopapps.sh script to stop any application tier processes that are running.
6. Log in as oracle and execute the /u01/install/APPS/scripts/startapps.sh script to start the application tier processes.
7. Access the Oracle E-Business Suite Login page. For example:
http://oc-129-144-15-144.compute.oraclecloud.com:8000/OA_HTML/AppsLogin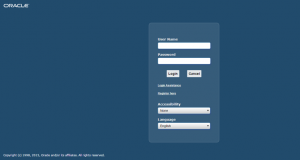
8. If needed add the host entry for the hostname and public ip.